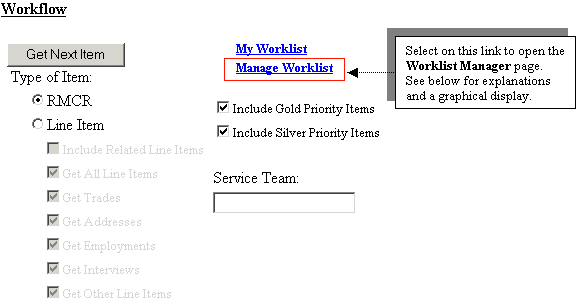
In the Workflow page within XpertOnline.net, there is a Manage Worklist link that Managers and Administrators in your office can use to assign work to updaters/processors based on user name and to see what type of work (an RMCR or a Line Item) will open next when the Get Next button is selected from the Workflow page. The link to open the Worklist Manager is found on the Workflow page in the area highlighted in red.

When you select the Manage Worklist link, the Worklist Manager page opens. From this page, Administrators/Managers in your office that work in XpertOnline.net can perform the following tasks:
- Assign work to updaters/processors based on user name,
- Assign priorities to RMCRs or Line Items to be worked on (Gold, Silver, or Standard),
- View the order that the Get Next button will open RMCRs or Line Items, and
- Open the Request Detail page and see the details on any request.
Click Here to view an example of what the Worklist Manager page looks like (this page contains a large GIF file--approx. 22 KB).
Note that the Worklist Manager page (displayed beneath the link above) is divided into RMCRs and Line Items. The only notable difference between these two sections is the Applicant vs. the Description column.
- Assigned--you can type in the Assigned field to assign work to the user name of an updater/processor. In the Worklist Manager page, you can assign an enire RMCR or a Line Item to an updater/processor in your office based on user name.
- Applicant (RMCR section) vs. Description (Line Item section)--
- Applicant (RMCR section)--this is the name of the Applicant and SSN of the Applicant as typed by your Subscriber/Client. Line Items that require manual attention from your updaters/processors are linked here: click on the Applicant name to view a list of outstanding Line Items for this RMCR.
- Description (Line Item section)--this is the name of the User Service and account that is outstanding. This link can be clicked to open the account and update it manually.
- # Tasks--this correlates to the linked Applicant name. The number listed is the number of outstanding line items that require manual attention for this RMCR request.
- Ordered--displays the date and time the request was ordered.
- Client #--displays the number of the Subscriber/Client's company that ordered the request.
- Company--the name of the Subscriber/Client's company that ordred the request.
- Team--for those of you using Service Teams, this is the name of the service team. It will be blank if you are not using the Service Team field.
- Status--displays the status of the entire RMCR request. These will usually be in a status of Updating, which indicates that this RMCR request needs to be manually updated before it can be sent back to the Subscriber/Client.
- Reference Number--this linked series of letter and numbers, when clicked, will open the Request Detail page.
- Set Priority--you can set the priority for the RMCR or Line Item request in this column. Clicking on either the Gold or Silver emblem or the 'Standard' text will assign that priority to the RMCR. Note that the priority that is NOT listed here is the current priority of the item. The priorities that are listed in the Set Prioritycolumn are what the item can be set to.
Other Items to Note
- The Worklist Manager page works in conjunction with the Get Next button. It displays the order that the Get Next button will open items to work on, based on priority and date.
- Gold priority items will display first, followed by Silver, then Standard in the Worklist Manager page.
- If an RMCR or a Line Item has been assigned, a name will display in the Assigned field and this item will not be found when the Get Next Item button is clicked.
|
